Showing posts with label 烘培. Show all posts

Sunday, October 25, 2020

Happiness in the kitchen 厨房里的快乐 -140 肉松叉烧酥


材料:

l.油酥材料(得油酥约240g,分割为16份)
     低筋面粉 (cake flour) 180g澄清黄油 (clarified butter)或猪油72g
2.水油皮材料 (得水油皮约360g,分割为16份)
      中筋面粉 all purpose flour 200g, 20g, 盐 5克澄清黄油,或猪油,或素油 80g, 
       温水 70g(请按情况调整水量)
3.叉烧肉:用烤箱300F,烤出来的叉烧切成小丁,拌上一点叉烧酱或者甜面酱放入冰箱中待用。
4.肉松酥:用暗红色的肉松酥,16份,每份一大勺。

做法:

1.先做水油皮:clarified butter 或猪油冻,microwave 融化成拌入allpurpose flour,再一点点加水拌匀,加5克盐,用小熊揉面机,揉I0分钟后,再醒20分钟。一定要软一点,放在室温高一点的地方,不能冷却,因为油会凝固,后面不好操作。

2.油皮是clarified butter 融化后拌入低筋面粉,用保鲜膜包裹好防止开裂。

3.将醒好的一半水油皮将包包子一样将一半的油皮包好,用擀面丈擀平,沿长边卷起来,再擀平卷起来,切成八份。另一半水油皮用相同的方式做油酥皮,全部16份酒酥皮好后要用湿巾纸盖好,防止干裂。

4.将一份油酥皮加一大勺叉烧,再加一勺肉松包好,手指粘点水封口,封口朝下放在烤盘上。

5.用375F 10分钟后,再涂上蛋黄液,再烤8分钟,最后改成400F5分钟上色。

Saturday, December 3, 2016

Happiness in the Kitchen 115 - 厨房里的快乐 115 - 草莓饼干)

Original from "http://www.marthastewart.com/315652/strawberry-shortcake-cookies"

I made a modification as follow, reduce the sugar in a half amount.

INGREDIENTS

12 ounces strawberries, hulled and cut into 1/4-inch dice (2 cups)
1 teaspoon fresh lemon juice
1/2 cup + 1tablespoons granulated sugar
4 cups all-purpose flour
4 teaspoons baking powder
1/2 teaspoon salt
6 ounces (6 tablespoons = 1+1/2 pc) cold unsalted butter, cut into small pieces
1 & 1/3 cup heavy cream
Sanding sugar, for sprinkling

DIRECTIONS

Preheat oven to 375 degrees. Combine strawberries, lemon juice, and 2 tablespoons granulated sugar. Whisk together flour, baking powder, salt, and remaining 1/2 cup granulated sugar in a large bowl. Cut in the butter or rub in with your fingers, until mixture crumbs. Stir in cream until dough starts to come together, then stir in strawberry mixture.
Using  a tablespoon, drop dough onto baking sheets lined with parchment, spacing evenly apart. Sprinkle with sanding sugar, and bake until golden brown, 24 to 25 minutes. Transfer to a wire rack, and let cool. Cookies are best served it immediately, but can be stored in an airtight container at room temperature for up to 1 day.

Thursday, January 1, 2015

Happiness in the Kitchen 112 - Cranberry Cookies 厨房里的快乐- 112 蔓越莓饼干


【蔓越莓饼干】
网上的方子:
配料:低筋面粉115克,鸡蛋液(打散的全蛋)1大勺(15ML),黄油75克,糖粉60克,蔓越莓干35克。
烘焙:165度,中层,约20分钟,至表面微金黄色。
制作过程:
1. 黄油软化后,加入糖粉,搅拌均匀。不需要打发。
2. 加入1大勺鸡蛋液,搅拌均匀。
3. 倒入蔓越莓干。如果蔓越莓干的个头比较大,需要先切碎(不要切太碎)。
4. 倒入低筋面粉
5. 搅拌均匀,成为面团。用手把面团整形成宽约6CM,高约4CM的长方体.并放入冰箱冷冻至硬(约需要1个小时,是冷冻不是冷藏哦)。
6. 冻硬的长方形面团用刀切成厚约0.7CM的片。切好后放入烤盘,放进预热好的烤箱烤

我更改后的配料(比较不甜):

配料:低筋面粉115克,鸡蛋液(打散的全蛋)1大勺(15ML),黄油60克,糖粉15克(加入黄油中打发),炼乳20g, 蔓越莓干15克。

Online prescription:
Ingredients: 115 g flour, eggs (beaten whole egg) 1 tbsp (15ML), butter 75 grams, 60 grams sugar, 35 g dried cranberries.
Baking: 365 degrees, about 20 minutes, until slightly golden surface.
Production process:
1. softened butter, add powdered sugar, and mix well. You do not need to pass.
2. Add 1 tablespoon of liquid egg, mix well.
3. Pour dried cranberries. If dried cranberries's head is relatively large, we need to be chopped (do not cut too broken).
4. Pour flour
5. Stir become dough. The dough is formed by hand the entire width 6CM, height of about 4CM the cuboid. And placed in the freezer until firm (takes about one hour, is not frozen Oh refrigerated).
6. frozen hard dough with a knife cut a rectangular piece of thick 0.7CM. After a good cut into the oven, put in the preheated oven

I changed the ingredients after (less sweet):

Ingredients: 115 g flour, eggs (beaten whole egg) 1 tbsp (15ML), butter 60 grams, 15 grams sugar (added butter to pass), condensed milk 20g, dried cranberries 15 grams.

Monday, September 2, 2013

厨房里的快乐 108 - 鲜肉小月饼

鲜肉月饼:吃起来酥皮一碰就掉,非常的酥香。
材料:
1.油皮:普通面粉2杯(200g), 素油3/4杯(75g), 水3/4杯(75g), 盐一勺, 糖一勺。
2.油酥:普通面粉1杯(120g), 油2/3杯(75g), 盐一勺.
3. 肉馅:像鲜肉包子馅一样拌好,放入冰箱置二小时以上。

若做芝麻馅:芝麻粉3大勺,butter 2tsb,糖2大勺,混合均匀,揉成8个小团子。
4. 蛋黄一只为刷皮用。

【油皮做法】:
1. 将面粉,油放入钢盆中,慢慢加入水混 合,搅拌均匀,表面较为光滑为止。
2. 将面团用保鲜膜包起,松弛30分钟待用。

【油酥做法】:
1. 将面粉、油放入一起混合拌匀。 用手搓揉,直到面粉与油完全混合。
2. 再继续搓揉,直到油酥不黏手,表面稍成光滑即可。

【油皮饼做法】:
1. 将油面, 油酥分割八份,每一份油皮压平,再放入一份油酥包起来。
2. 用双手压住油皮周围,由外向内合紧,再把多余的油皮捏紧。
3. 将油酥皮杆成长方形,由上至下把油皮卷起。再压平再卷起,切成二份待用。
4. 将一份油酥皮对切半的那面朝上,另一边朝下,用手稍微压一下,包上鲜肉馅,用虎口将油酥皮周围由外往内合紧,可以收口处沾点水帮助收口。放在烤盘上。 刷上蛋黄液。
5. 然后再粘黑芝麻放入烤箱预热10分钟,365F,烤16~18分钟。


Tuesday, January 1, 2013

厨房里的快乐106 - 新鲜小面包 (BY AJ)


2013 的第一博客是AJ做的简单的面包。可以每天都做新鲜的。


Bread Recipe

Ingredients:
2.5 Cups of Bread Flour
1 Cup of Microwaved Water
1 TBsp of Oil
1 TBsp of Sugar
1 TBsp of Yeast
1 tbsp of Salt

Steps:

1. Mix all of the ingredients together in a mixing machine until it becomes dough. Add bread flour if your finger sticks to the dough.

2. Use regular flour and some oil to grease the mixing bowl under the dough, and set it on a hot surface. Let the dough rise for 45 - 60 minutes.

3. Once risen, take the dough and put it into baking containers, then punch it down until it can be risen again. Let it rise the second time, this time not with heat, while preheating the oven at 375 degrees. 

4. Put the pans with dough into the oven for about 20 minutes. Cool them and then let the bread slide out. 

Saturday, December 15, 2012

厨房里的快乐 105 - 栗子蛋糕


这款以戚风做糕体,栗子奶油的蛋糕是以爱·厨的copy版。
在材料上有所改:

栗子蛋糕(戚风) 

材料: (9吋) 
蛋糕体:蛋6个,熟栗子一袋,砂糖40g,色拉油60 ml,果汁1大匙,牛奶3大匙,中筋面粉80g,白醋1小匙。
栗子夹馅:熟栗子一袋,鲜奶油3大匙,砂糖40g。
栗子鲜奶油:熟栗子一带,鲜奶油一pt,糖粉3大匙,果汁1大匙。
装饰材料:熟栗子几颗。 


做法: (全部按照“爱厨 -http://blog.wenxuecity.com/myblog/7724/200710/11929.html;
还有视频:http://blog.wenxuecity.com/myblog/7724/201006/25312.html)

1. 将栗子用食物调理机打成细粉状备用。
2.分开蛋黄与蛋白. 蛋黄分数次加入砂糖40g搅打至发泡、颜色变浅黄且体积膨胀,倒入栗子泥、色拉油、牛奶、果汁搅拌均匀。倒入面粉,用橡皮刀拌匀至无粉粒。
3. 烤箱预热至325F。
4.蛋白加入白醋,用搅拌器打至起泡,然后分三次加入剩下的砂糖,持续打至中性发泡即可。
 舀出大约1/3的蛋白泡放入蛋黄面糊中,搅拌均匀之后,把面糊全部倒回剩下的蛋白泡中,大范围且由下往上搅拌均匀(将盆底的面糊往上翻出),注入烤模中,用力震一下烤模使大气泡释出,入炉烘烤约30~35分钟。
5. 出炉之后用力震一下烤模,然后立刻连模翻转倒扣待凉。完全凉透时,翻回来脱模,并横切成二层蛋糕片,抹上栗子夹馅,外面用栗子鲜奶油霜饰即可。
小贴士:
1. 栗子鲜奶油:将栗子用食物调理机打成细粉状,搅拌棒与打蛋盆放入冰箱冷冻半小时备用。打蛋盆里倒入鲜奶油与栗子泥用搅拌器打散,然后加入糖粉继续搅打至成固态。
2. 栗子夹馅:将栗子用食物调理机打碎但仍保留少许块状,将奶油加热融化,倒入砂糖搅拌至溶解,倒入栗子泥搅拌均匀,完全冷却之后,倒入一杯已打发的栗子鲜奶油拌匀即可。
7. 先将 栗子夹馅夹入二层蛋糕片中。再装饰外层奶油层 (图2)。

Thursday, November 22, 2012

厨房里的快乐 104 - cranberry cheese cake


Ingredients

  • 3/4 cup graham cracker crumbs
  • 1/2 cup finely chopped macadamia nuts
  • 2 tablespoons  Sugar
  • 1/4 cup butter, melted
  • 1 envelope unflavored gelatin
  • 1/4 cup cold water
  • 2 packages (8 ounces each) cream cheese, softened
  • 14 ounces whole-berry cranberry sauce
  • 1 cup heavy whipping cream
  • SUGARED CRANBERRIES:
  • 1 envelope unflavored gelatin
  • 1/4 cup cold water
  • 1 package (12 ounces) fresh cranberries or frozen cranberries, thawed
  • 2/3 cup superfine sugar

Directions


  • In a small bowl, combine the cracker crumbs, nuts and sugar. Stir in butter. Press onto the bottom of a greased 9-in. springform pan. Place on a baking sheet. Bake at 350° for 10 minutes or until lightly browned. Cool on a wire rack.
  • In a small saucepan, sprinkle gelatin over cold water; let stand for 1 minute. Heat over low heat, stirring until gelatin is completely dissolved; cool slightly.
  • In a large bowl, beat cream cheese  Beat in cranberry sauce. Add cooled gelatin; mix well.
  • In a small bowl, beat cream until stiff peaks form. Fold into cream cheese mixture. Pour over crust. Refrigerate for 8 hours or overnight.
  • In a microwave-safe bowl, sprinkle gelatin over cold water; let stand for 1 minute. Microwave on high for 1-2 minutes, stirring every 20 seconds, until gelatin is completely dissolved. Whisk until slightly frothy.
  • Lightly brush mixture over all sides of berries. Place on a wire rack over waxed paper; sprinkle with superfine sugar. Let stand at room temperature for up to 24 hours (do not refrigerate or the sugar will dissolve).
  • Just before serving, carefully run a knife around edge of pan to loosen. Spoon sugared cranberries over cheesecake. Refrigerate leftovers. Yield: 12 servings.

Nutritional Facts1 slice equals 474 calories, 29 g fat (16 g saturated fat), 79 mg cholesterol, 229 mg sodium, 51 g carbohydrate, 2 g fiber, 5 g protein.

Monday, November 19, 2012

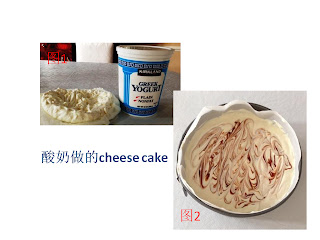
厨房里的快乐 103 - 酸奶做的 cheese cake


看到一篇文章说,女人喜欢 cheeses cake 就象喜欢女人高跟鞋:明知道穿着不舒服,不能走路,却还要拥有一双又一双!  cheeses cake 就是我喜欢之一的一道点心! 而这款用 non-fat yogurt 代替cheeses 的cheeses cake可以放心地享受,因为口感和味道和原味cheeses cake 一模一样。


材料:
1. 皮:1&1/3杯面粉,1杯打碎的nuts,1条融化的butter拌匀,倒入一个7寸的可脱底烤盘,放烤箱325F/170C, 烤10分钟,放入冰箱冷藏至少半小时以上。
2. 馅:无糖酸奶500g(滤水过后,约200g),heavy cream 200ml, 鸡蛋 2个,糖 60g,巧克力 数滴,玉米芡粉一勺。

步骤:
1. 酸奶滤水可以用一张厨房纸或纱布垫在筛框里,酸奶倒进去,放置一个晚上
滤水过后是这种样子的,完全不会散开,处于半凝固状态(图1)。
2. 将鸡蛋+糖先均匀。
3. 再加所有的馅材料搅拌均匀。
4. 然后将3倒在凉却的皮上,放入烤箱第一层,在烤箱第二层再放一个加入热水的大一些的烤盘。在烤箱里300F/160C,烤45-50分钟,直到中间已经凝固。烤箱关火,但是不要把蛋糕拿出来,让它继续在烤箱呆1个小时左右,取出来放网架上冷却10多分钟.


Monday, May 28, 2012

厨房里的快乐 98 - 戚风蛋糕卷


也是从网上的方子:http://blog.wenxuecity.com/myindex/7724/
戚风蛋糕卷 

材料: (卷好长度为15吋)
蛋4个,糖 80g (蛋白和蛋黄各一半),牛奶50 ml,沙拉油 45ml,兰姆酒或水果酒15ml,低筋面粉80g,泡打粉 半小匙,白醋或柠檬汁1小匙。
夹馅:液态鲜奶油1杯,糖粉3大匙,切碎的草莓丁约半杯。
工具: 
10x15吋长方浅烤盘(26x38.5 cm),烤盘纸2张,电动搅拌器,橡皮刀。

做法: 
1. 烤盘上铺纸,在边缘四个角落各剪出一个缺口,整理烤盘纸使服贴在烤盘上。烤箱预热至180 C/ 350 F。
2. 蛋黄与蛋白分开,大碗里放入蛋黄与大约一半的糖,搅拌均匀,加入牛奶、兰姆酒与植物油搅拌至糖溶解。混合低筋面粉与泡打粉,筛入蛋液中,搅拌至无粉粒。
3. 在干净无油的打蛋盆中放入蛋白与白醋一起打发,中途加入剩下的糖,直到中性发泡(提起搅拌头可以拉出尖角且翻转也不会滴落)。
4. 用橡皮刀舀出1/3蛋白泡与蛋黄面糊拌匀,然后把拌好的面糊全部倒回剩下的蛋白泡中搅拌均匀,倒入烤盘中,把表面括平,用力震一下烤盘释放大气泡,然后放进烤箱烤约12分钟。
5. 鲜奶油加入糖粉一起打发至固态,拌入草莓丁备用。准备好一个冷却架,上面铺好一张烤盘纸(B),蛋糕出炉后,立刻倒扣在烤盘纸(B)上,静置25分钟待凉,冷却之后撕掉蛋糕底纸(A:原来铺烤盘用的那张),将蛋糕底纸(A)干净的那面朝上放好,将蛋糕片整个翻过来倒扣在底纸(A)上,然后再撕掉烤盘纸(B)丢弃不用。蛋糕表面抹上一层鲜奶油夹馅(最远的末端要保留约1吋长不涂鲜奶油,这样收口处才不会有鲜奶油溢出),以15吋长的那端开始卷起,这时可以用下方的烤盘纸(A)辅助收卷,还可以用杆面杖顶在后方帮助使收卷的角度平均,一边卷,一边收起烤纸,收尾处调整在正下方,以烤纸(A)包裹、移入冰箱冷藏静置半小时即可切片食用。

Recipe found online: http://blog.wenxuecity.com/myindex/7724/

Materials:
4 eggs
Sugar 80g 
50 ml of milk 
3 tablespoons salad oil
1 tablespoon of rum or wine
 low-gluten flour 80g 
half tsp baking powder 
1 tsp white vinegar or lemon juice.
Stuffing: 
Heavy Cream
1 cup powdered sugar 
3 tablespoons chopped strawberries which is about half a cup.
Tools:
10x15-inch shallow rectangular baking pan (26x38.5 cm) 
baking paper 
an electric mixer
a rubber spatula

Instruction:
1. Lay the baking paper in the pan and cut off the excess paper. Preheat oven to 180 C / 350 F.
2. Separate the egg yolk and whites, and put the egg yolk in a big bowl. Add about half of the sugar, stir, then add the milk, rum and vegetable oil and stir until the sugar dissolves. Mix the flour and baking powder in a separate bowl, then add into the egg mixture and stir until mixed. 
3. In a clean oil-free pot pour the protein and vinegar together to around half the pot. Add the remaining sugar, until mixed well. (the mixing head can be pulled out if hitting the sides of pot and flipped; will not drip).
4. With a rubber spatula scoop out 1/3 of the egg white mixture and egg yolk batter and mix well, then the bubble of marinated batter all fell back to the rest of the protein Stir, pour into a baking dish, including the surface level, hard look at earthquake pan to release large air bubbles, and then into the oven and bake for about 12 minutes.
FIVE fresh cream by adding powdered sugar together sent to the solid state, mix the strawberries spare. Ready for a cooling rack, above the paved a baking paper (B), immediately after the cake is baked, upside down on a baking paper (B) and let stand 25 minutes and let cool, and cooling to tear up the cake at the end of paper (A : the original shop pan goes) will clean it face down on the cake at the end of paper (A) put away the cake slices over and upside down on the backing paper (A), and then tear up the baking paper (B) to be thrown away. Cast a layer of whipped cream stuffed to the surface of the cake (as far as the end to retain about 1 inch long coated whipped cream, so shut Department will not whipped cream overflow), began to roll up to 15 inches long end of the line, which the bottom of the baking paper (A) can use the auxiliary winding to help make the average of the winding angle can also be used to stick the top of the club face in the rear side of the volume, while away the baking paper, ending at the adjustment just below, to bake paper (A) parcel, moved into the refrigerator to put it aside for half an hour to slice edible.


Monday, April 30, 2012

厨房里的快乐 95: 豆沙的烤箱做法


材料: 


1.红豆 或 绿豆一袋(约35g),糖 1/2杯,素油1/2,butter 2tsp。

做法: 

1. 红豆或绿豆放入高压锅,放入3倍清水,煮开后,小火20分钟。
2. 分兩~三次用果汁机打成泥状,然后放入 7X8'' 的玻璃容器。玻璃容器底和边上都用butter 抹一层。然后倒入烧好的豆沙和糖,素油拌匀。
3.放入预热 250oC 的oven 烤 1~2 小时,看到豆沙基本干即可。
4. 省去炒的过程,避免了油溅出了的情况。
5. 绿豆的话,可以买没有带皮的绿豆,这样煮起来会更快些。


Friday, April 20, 2012

厨房里的快乐 94 - 绿豆沙糯米年糕


网上搜索一下糯米年糕,可以找到很多方子。我的这款略略有些该动。
用料:
1.绿字糯米粉一包(454克),糖3/4杯。
2.鸡蛋两只,素油1/4杯,butter 2 tsp, 牛奶1+1/2杯。
3.绿豆沙1杯。

做法:
1.干料:糯米粉加糖拌匀。
2.湿料:鸡蛋两只打散后,先加油再加牛奶搅拌均匀。
3.然后将湿料到盛干料里,搅拌均匀至无颗粒。
4.然后将一半的料倒入8X9英寸的涂了少许玉米油的玻璃烤盘中。将烤盘放入预热至370F的烤箱内,烤10分钟后,
5.将绿豆沙放在上面,再接着加入另一半料拌匀,再倒入烤盘中再烤30分钟,即可。

Sunday, September 11, 2011

Wednesday, February 23, 2011

厨房里的快乐78 - 饼干和巧克力


噢!原来巧克力也可以DIY.
所有的材料都是ACMORE 买来的。然后按照上面的 instruction 就可以啦。


这款饼干在厨房里的快乐50 已经写过。这次是用做蛋糕的挤花嘴做出造型。是不是很漂亮啊?

Friday, October 22, 2010

Sunday, September 19, 2010

厨房里的快乐68 - 中秋节快乐


啊,月饼原来也可以这么简单再做得这么漂亮噢!


月饼材料:(20克的月饼12个:蛋黄4个,豆沙4个,果仁4个)

饼皮:低筋面粉( cake flour) 200克, 糖浆(King golden syrup)110克,素油55克,苏打粉1/2茶匙+1大匙的水。
饼皮比例是低筋面粉 : 糖浆 : 玉米油 = 100:55:27.5.一定要以这个比例,否则会烤裂.

馅料:
1.豆沙馅适量,熟的咸蛋黄4个;
红豆(绿豆),色拉油,砂糖:红豆(绿豆)泡一晚。锅里放入豆子及没过豆子表面的水,煮至豆烂熟稍凉捞出放入搅拌机里打成泥。将打好的豆泥倒入不沾锅里煮至粘稠,然后加入砂糖,以中火炒至产生黏性,再将油分数次一点一点加入,炒匀,放凉即可。
2. 五仁馅 - 芝麻,核桃仁,大杏仁,胡桃仁,松子,瓜子仁, 烤箱预热300F,烤10分钟, 放入搅拌机里打碎.
刷饼皮:蛋黄1个+1大匙水。

做法:
1.苏打粉加水融化,放入糖浆和油拌匀,放入低粉拌匀,盖上保鲜膜醒1个小时。
2.面团醒发后,分成15分。
3.取一面团稍稍压扁,放入月饼模具中压出形状,放上豆沙,一手托着面团,另一手用拇指轻轻把面团往上推,直到包住馅。(面团非常柔软,很容易就包好了,如果粘手,可以用些糕粉).
4.放入饼模,用掌心轻轻压平。
5. 饼模反扣轻敲就可以轻松脱模了。
6.把月饼放入铺了锡箔纸的烤盘上,烤箱预热375F,烤6分钟,用蛋黄水刷饼皮:表面微微上色,再入烤箱烤15分钟。(如果不怎么上色,可以用上火低档BROIL1 -2 分钟, 各烤箱略有不同, 注意温度和时间).


冰皮豆沙月饼 参考分量:冰皮月饼约6个)

冰皮配料:糯米粉45克,粘米粉35克,澄面(小麦淀粉)20克,牛奶185克(可用椰奶),
糖粉25克,色拉油20ml (一大勺).
馅料:豆沙馅适量.
另准备糕粉(炒熟的糯米粉)适量.
制作过程:
1.在盆里倒入牛奶、糖粉、色拉油搅拌均匀。
2.倒入糯米粉、粘米粉、澄面。充分搅拌均匀,成为稀面糊.
3.搅拌好的稀面糊静置30分钟,分一半,然后 Microve,1分钟翻面,再1分钟翻面即可蒸熟。
4.蒸熟的面糊,等待其冷却,就是冰皮了。
5、冷却后(如果心急,可以不等到完全冷却,不烫手即可。但完全冷却不好操作),把冰皮分成2X3份。
6、在模具里撒点糕粉,让糕粉均匀粘在模具壁上,然后把多余的糕粉倒出来。这样可以方便脱模.
7、在手上拍点糕粉防粘,然后将冰皮放在手心稍稍压扁,放入月饼模具中压出形状,放上豆沙,一手托着面团,另一手用拇指轻轻把面团往上推,直到包住馅,直到把豆沙全部包裹住,收口。
8、用手掌压实了。
9、把月饼模用力磕一下,再倒出来,冰皮月饼就做好了。
10、做好的月饼放进冰箱,冷藏一晚,就可以吃了。

Sunday, June 13, 2010

厨房里的快乐67– 肉松面包(中式面包的三步骤)


在文学城看到有人做了这款"肉松面包",就很想来试试,没想到就做成功了.
材料和厨房里的快乐21-中式面包成功版一样,做法和也一样,我减化了一些.
中式面包的三步骤:

材料:
1. 牛奶 1 杯(150ml),鸡蛋 1 个(Large的),高筋面粉 (bread flour)3 杯,糖 50 g (约4tbsp),盐 1tsp,发酵粉 (yeast) 3 tsp,heavy whipping cream 1/2 杯。
2. butter 2tsp, 蛋黄一个打散加水,装饰表面的。肉松3tbs作馅.

做法:

1.牛奶加1tbsp白糖 用microwave 加热15-20 秒到不烫手,再加1tbsp面粉和3 tsp 发酵粉 (yeast),搅拌均匀,静置10分钟以上,看到有泡沫发起.这是第一次发酵。

2. 鸡蛋提前从冰箱拿出回温到室温, 我是用Mixer揉面, 将1个鸡蛋打散 加(1)发酵粉水和全部的面粉+heavy whipping cream,sugar和盐,揉5分钟至揉约20分钟.

3. 拿一个大容器, 上面倒点油,抹开,放(2)上面揉好的面团,上面盖一张湿润的bounty paper, 放到oven 内发酵 (oven 先开 warm 档,到达温度 后关掉,再放入面团), 等到面团发至原来的两倍大, 这是第二次发酵.

4. 第二次发酵后,将发酵好的面团杆成大的长方形薄片, 抹上一半奶油, 两面向中间折起来,把面团切成3份,取其中的一份. 再杆成大的长方形薄片,放进抹了油的烤盘里(8x6 inch), 面包生胚就做好了,将面包生胚,放在暖和的地方保温, 等到面团发至原来的1倍大, 这是第3次发酵。将表面涮上蛋液 就可以烤了。

5. 烤箱加热到385F后,放入面包烤10-15分钟 (依面包的大小调时间).马上取出,趁热卷起,待用.

6.等略凉后先抹上一层Mayonnaise,再抹一层肉松在内层,就好了。(如图)

Friday, April 16, 2010

厨房里的快乐63-戚风橙汁蛋糕成功版:


今年妈妈的生日正好在我们这里,就做了这款好吃又健康的鲜奶油蛋糕。

用料(for 8" pan, 图1):

1.鸡蛋3个 (分开蛋黄、蛋白),
2. 低筋面粉 (cake flour) 1杯,
3. 糖 1/2杯,糖粉 (没有用糖也行) 3汤匙,
4. 泡打粉 1 1/4茶匙,(Baking powder )
5. 盐 1/4茶匙,
6. 玉米油 1/4杯,
7. 果汁1/4杯,
8. Vanilla extract 1/2汤匙,
9. Cream of Tartar(可用白醋代替) 1/4茶匙。
10. 装饰用的heavy cream 2杯。
11. 新鲜草莓,peach等等。
做法:
1. 把玉米油、Vanilla extract、果汁倒进一容器(外卖的plastic桶),慢速再中速搅拌三四分钟, 看到橙汁和油完全混合成白色状。加入糖粉再打一分钟. 然后加入蛋黄用橡皮spatula搅拌.
2. 面粉、泡打粉搅拌混合过筛, 加盐,加入蛋黄面糊, 先慢速再中速搅拌两三分钟,看到没有干粉后转中速打大概一分钟。其间停一两次用橡皮spatula把边上的面糊刮到中间。
3. 把蛋白倒进搅拌器的碗(Mixmaster's bowl),移到搅拌器下,先慢速再中速再中高速把蛋白打到起泡沫大概两分钟,加入tartar,
把蛋打到好像whipped cream大概3、4分钟,加入糖粉再打一分钟。(图2)。
4.用spatula把打好的蛋白分三次轻轻的掺和进面糊碗中。然后倒进烤盘.
5.放进预热325F(160C)的烤箱烤四十分钟。关炉等两三分钟把烤盘拿出架空倒置。
6.凉后用刀使蛋糕和烤盘分开倒出。切成俩片。
7. 将heavy cream 用mixmaster先慢速再中速再中高速把heavy cream打到起泡沫大概两分钟。然后用橡皮spatula装饰上蛋糕(图3)。

Friday, January 1, 2010

厨房里的快乐51- 芝麻酥饼 新年快乐!


我很喜欢吃酥饼,所以就总留心好做酥饼的方子。这款酥饼是我试最好的,也是最有营养的,做起来也是最简单的。
吃起来酥皮一碰就掉,非常的酥香。
材料:
1.油皮:普通面粉2杯,素油1/2杯,水1/2杯,糖1大勺.
2.油酥:低筋面粉1杯,油2/3杯.
3. 芝麻馅:芝麻粉3大勺,butter 2tsb,糖2大勺,混合均匀,揉成15个小团子。

【油皮做法】:
1. 将面粉,油放入钢盆中,慢慢加入水混 合,搅拌均匀,表面较为光滑为止。
2. 将面团用保鲜膜包起,松弛30分钟待用。

【油酥做法】:
1. 将低筋面粉、油放入一起混合拌匀。 用手搓揉,直到面粉与油完全混合。
2. 再继续搓揉,直到油酥不黏手,表面稍成光滑即可。

【油酥饼做法】:
1. 将油皮, 油酥分割仨份,每一份油皮压平,再放入一份油酥包起来。
2. 用双手压住油皮周围,由外向内合紧,再把多余的油皮捏紧。
3. 将油酥皮杆成长方形,由上至下把油皮卷起。再压平再卷起,切成五份待用。
4. 将一份油酥皮对切半的那面朝下,用手稍微压一下,包上芝麻馅,用虎口将油酥皮周围由外往内合紧,放在烤盘上。
5. 然后再粘黑芝麻放入烤箱预热10分钟,365F,烤16~18分钟。

Friday, December 18, 2009

厨房里的快乐50 – 祝大家节日快乐! 节日的酥糖和饼干


2009年我很高兴,因为我的博客在2009年发表了50期啊!但是,让我觉得更开心的是做了这个博客。因为当我在做饭,烘焙,烧烤,甚至简单的使用微波炉烹调,然后把过程写下来时,我想我能够和这份烹调时快乐给予大家。
谢谢大家给我鼓励,我们将继续分享我们在2010年每一个幸福的时刻.
由于是假期即将来临,我有一些甜点和饼干想与大家分享。

建萍


图片1是爆米花酥糖(Rice krispie treats),做法是和前面写过的"厨房里的快乐5 - 果仁酥糖"一样。
原料:
1. 1袋爆米花(rice krispie)8oz,在超市可以买到.
2. 1/2 lb 白芝麻,
3. 棉花糖 Marshmallows 1/3 bag or 3 oz. ,2大勺butter。
做法:
1.芝麻用烤箱300F,10分钟烤熟,当心不要烤焦。
2.棉花糖marshmallows加butter在锅里用小火加热融化,加入爆米花,拌匀。长方型的容器底部先放parchment paper(Walmart有卖)防粘,再放爆米花棉花糖压平,等凉透成形后,切块。

图片2是好朋友给我的花生酱饼干,非常松脆.
材料: 
1. 奶油 1杯(等于2条,室温放软),
2. 黄砂糖(Golden Brown Sugar)1/2 杯, 白 砂糖 1/2杯,
3. 蛋 3个,一个一个加入,
4. peanut butter 1杯,
5. pure vanilla extract 2 小 匙.
6. 中筋面粉2杯,
7. 盐1/4 小匙, bake soda 1/2小匙, bake powered 1/2小匙 (tsp),
1. 烤箱(oven)预热300F,
2. 用电打蛋器按照序列材料一个一个加在大容器中混合,直到拌匀.
3. 用汤匙将混合料一勺一勺放到烤盘上,每个开1 1 / 2英寸。再用叉子在饼干表面压出patter。然后烤约20分钟,或烤到金黄色.

图片3 是我看了网上的receipt后再发挥的。
材料: 
1. 奶油 1/2杯(等于1条butter,室温放软),
2. 白砂糖 3/4杯,
3. 蛋 1个,
4. pure vanilla extract 1 小 匙.
5. 中筋面粉1 3/4杯,
6. 盐1/8 小匙, bake powered 1/2小匙 (tsp),
7. baking chocolate 一小块用microwave 融化;
做法:
1. 烤箱(oven)预热350F;
2. 用电打蛋器按照序列材料1-6一个一个加在大容器中混合,直到拌匀,分成等份的2份面团;
3. 将融化的baking chocolate 一半揉入其中的1份面团,将2份面团揉成同等大小的面饼,然后卷成一卷;
4. 再放到冰箱里1小时;
5. 从冰箱取出面团后,将卷成的面卷切成1/2inch 的簿片,因为一份面团是深色的chocolate,所以切成的簿片是夹色。
6. 放到baking sheet(parchment paper),然后烤约10分钟左右.
7. 用叉子将融化的baking chocolate 另一半装饰在烤好的饼干上。(如图3)。