Thursday, November 22, 2012

厨房里的快乐 104 - cranberry cheese cake


Ingredients

  • 3/4 cup graham cracker crumbs
  • 1/2 cup finely chopped macadamia nuts
  • 2 tablespoons  Sugar
  • 1/4 cup butter, melted
  • 1 envelope unflavored gelatin
  • 1/4 cup cold water
  • 2 packages (8 ounces each) cream cheese, softened
  • 14 ounces whole-berry cranberry sauce
  • 1 cup heavy whipping cream
  • SUGARED CRANBERRIES:
  • 1 envelope unflavored gelatin
  • 1/4 cup cold water
  • 1 package (12 ounces) fresh cranberries or frozen cranberries, thawed
  • 2/3 cup superfine sugar

Directions


  • In a small bowl, combine the cracker crumbs, nuts and sugar. Stir in butter. Press onto the bottom of a greased 9-in. springform pan. Place on a baking sheet. Bake at 350° for 10 minutes or until lightly browned. Cool on a wire rack.
  • In a small saucepan, sprinkle gelatin over cold water; let stand for 1 minute. Heat over low heat, stirring until gelatin is completely dissolved; cool slightly.
  • In a large bowl, beat cream cheese  Beat in cranberry sauce. Add cooled gelatin; mix well.
  • In a small bowl, beat cream until stiff peaks form. Fold into cream cheese mixture. Pour over crust. Refrigerate for 8 hours or overnight.
  • In a microwave-safe bowl, sprinkle gelatin over cold water; let stand for 1 minute. Microwave on high for 1-2 minutes, stirring every 20 seconds, until gelatin is completely dissolved. Whisk until slightly frothy.
  • Lightly brush mixture over all sides of berries. Place on a wire rack over waxed paper; sprinkle with superfine sugar. Let stand at room temperature for up to 24 hours (do not refrigerate or the sugar will dissolve).
  • Just before serving, carefully run a knife around edge of pan to loosen. Spoon sugared cranberries over cheesecake. Refrigerate leftovers. Yield: 12 servings.

Nutritional Facts1 slice equals 474 calories, 29 g fat (16 g saturated fat), 79 mg cholesterol, 229 mg sodium, 51 g carbohydrate, 2 g fiber, 5 g protein.

Monday, November 19, 2012

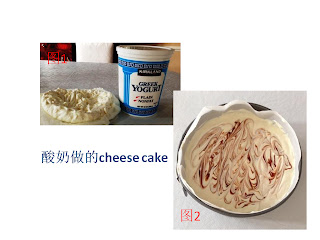
厨房里的快乐 103 - 酸奶做的 cheese cake


看到一篇文章说,女人喜欢 cheeses cake 就象喜欢女人高跟鞋:明知道穿着不舒服,不能走路,却还要拥有一双又一双!  cheeses cake 就是我喜欢之一的一道点心! 而这款用 non-fat yogurt 代替cheeses 的cheeses cake可以放心地享受,因为口感和味道和原味cheeses cake 一模一样。


材料:
1. 皮:1&1/3杯面粉,1杯打碎的nuts,1条融化的butter拌匀,倒入一个7寸的可脱底烤盘,放烤箱325F/170C, 烤10分钟,放入冰箱冷藏至少半小时以上。
2. 馅:无糖酸奶500g(滤水过后,约200g),heavy cream 200ml, 鸡蛋 2个,糖 60g,巧克力 数滴,玉米芡粉一勺。

步骤:
1. 酸奶滤水可以用一张厨房纸或纱布垫在筛框里,酸奶倒进去,放置一个晚上
滤水过后是这种样子的,完全不会散开,处于半凝固状态(图1)。
2. 将鸡蛋+糖先均匀。
3. 再加所有的馅材料搅拌均匀。
4. 然后将3倒在凉却的皮上,放入烤箱第一层,在烤箱第二层再放一个加入热水的大一些的烤盘。在烤箱里300F/160C,烤45-50分钟,直到中间已经凝固。烤箱关火,但是不要把蛋糕拿出来,让它继续在烤箱呆1个小时左右,取出来放网架上冷却10多分钟.


Sunday, November 11, 2012

厨房里的快乐 102 - Lasagna Cupcake


实在不知道中文应该如何翻译了。就是一款意大利面。
原料:
1. 1/3磅碎牛肉,洋葱半只和蘑菇3只切碎,油2 勺,盐和胡椒;
2. 12 张饺子皮;
3. 3/4杯磨碎的Parmesa(3盎司);
4. 3/4杯切碎的mozzarella(3盎司);
5. 3/4杯Ricotta cheese(3盎司);
6. 1杯意粉酱。

做法:

1. 烤箱预热至375度。喷油在muff 的锡盘上。
2.锅里放油后,加 碎牛肉,切碎的洋葱半只和蘑菇3只,盐和胡椒,再加Ricotta  mozzarella。加1杯意粉酱拌匀,除去多余的水。
3. 开始分层烤宽面条蛋糕。首先用饺子皮,然后按到每个muff 盘的底部。撒上一点点的Parmesa芝士。顶端有一点肉类和面食酱(图1)。
4.重复层(饺子,牛肉酱)。顶部保留Parmesa奶酪(图2)。
5. Bake 15分钟或直到边缘是金黄色的。从烤箱中取出,放凉5分钟。(图3)


Ingredients

1/3 pound ground beef
12 dumping wrappers
1 cups grated Parmesan cheese (4 oz)
1 cups shredded mozzarella cheese (4 oz)
3/4 cup ricotta cheese (3 oz)
1 cup pasta sauce

Directions

1. Preheat oven to 375 degrees. Spray muffin tin with cooking spray.
2. Brown beef, and season with salt and pepper. Drain.
3.Reserve 3/4 cup Parmesan cheese and 3/4 cup mozzarella cheese for the top of your cupcakes. Start layering your lasagna cupcakes. Begin with a  dumping wrapper and press it into the bottom of each muffin tin. Sprinkle a little Parmesan cheese, ricotta cheese, and mozzarella cheese in each. Top with a little meat and pasta sauce.
4. Repeat layers again (i.e.  dumping wrap,  Parmesan, ricotta, mozzarella, and pasta sauce). Top with reserved Parmesan and mozzarella cheeses.
5. Bake for 18-20 minutes or until edges are brown. Remove from oven and let cool for 5 minutes. To remove, use a knife to loosen the edges then pop each lasagna out.